My son has been curious about what happens to our recycling after we put it in the bin and it's collected. Seeing the bin lorries has been a highlight of some of his days confined to home, and I thought we could attempt some paper recycling to demonstrate how paper we don't want anymore can be turned into new paper products. The process it goes through in a recycling plant is more complex, with de-inking and removal of other contaminants e.g. staples, but we did a simple version.
We took some paper which we'd finished using - some scraps from cutting out shapes,
the 'magic E' words we looked at with infrared light and a few other bits of paper which would otherwise have gone in our recycling. Together, we shredded them into small pieces. There was a mix of white, purple and red paper.
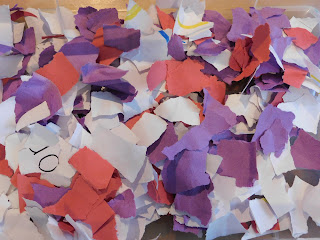 |
| Torn up paper |
The next step in paper recycling is pulping. and we did a simplified version, adding warm water to soak the paper and then my son watched as I used a stick blender to turn the paper into slurry. We talked about what the paper was made from originally - trees - and how by recycling we didn't need to cut down as many more trees to make paper.
 |
| Stirring his pulp |
I had a look at the apparatus various sources recommended to make your own paper at home, and decided to improvise with what we had to hand. This method didn't produce neat and tidy edges, but for our purposes it was fine. I found some scraps of plastic mesh I had for making tapestry Christmas decorations a long time ago, and hot glued some pieces together to make a rectangle a little smaller than a sheet of A4. I think most types of mesh would do, and metal mesh is probably better but this is what we had and it was ok. You just need something with a bit of rigidity so it doesn't sag too much with the weight of wet paper on top of it, but which lets water strain through. You also need something to soak the water out of the paper, and we used some towels and a piece of felt.
To make the paper from the pulp which was in a large rectangular box, we dipped the mesh in and gently shook it until the mesh sank to the bottom with the pulp on top of it. We then pulled the mesh up through the pulp slowly and carefully together. In truth, we did this three times until we were collectively sufficiently slow and careful not to have a lump of paper in the middle and none at the edges!
 |
| Pulp on the mesh |
We put the paper, mesh side down, on a folded towel. We then put a piece of felt on top and another towel on top of this. We used very old towels, and whilst they went a little purple it did wash out, although I wouldn't use your nicest towels for this just in case! My son then carefully rolled over the towels with a rolling pin to squeeze some of the water out of the paper.
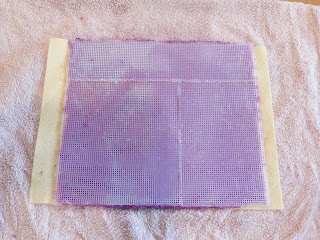 |
| Mesh side up - you can see the lines where I glued pieces together |
We turned the stack of towels carefully upside down such that the felt was underneath the sheet of paper and the mesh on top, removed the top towel and then carefully peeled the mesh off the paper. I then transferred the paper, on the felt, to a baking tray and we left it outside in the sun for a few hours. When it was still a little damp, we carefully peeled it off the felt and put it back on the tray to dry - we left it for a full 24 hours, mostly indoors. We actually made a second piece too as soon as we removed the mesh, although there wasn't quite enough pulp left so it's a little uneven compared to the first.
 |
| Finished piece with a hand and foot print |
Both sheets warped a little whilst drying, so we put them in a heavy book to flatten overnight. It's pretty thick paper, and there's the pattern of the mesh on one side, but it's definitely useable and my son was pleased with our efforts. We decided to use the first piece we made for a keepsake, and used white paint to print his hand and foot print on the paper. It turned out quite nicely, with both the prints and impressions of his fingers from where he poked the paper when it was drying!


Comments
Post a Comment
All comments are moderated before being published.